Quick and dirty USB switched output driver using an old USB keyboard

10th Sept 2015 - Pete
This is a quick and cheap way to be able to switch a couple of electrical loads via the USB port using an old USB keyboard. It's not particularly elegant as there are some compromises but it is quite easy to implement. This approach could also be used for push button inputs but this was not a requirement for my particular application.
I was dabbling with python to produce an application to run on a my Windows based laptop/netbook and wanted to independently switch a couple of low voltage halogen lamps when using an attached web camera. Using the USB port to an Arduino was a possibility but seemed like overkill for just two On/Off drives so I started to look at the small controller PCB found typically in the back of USB keyboards.
Most USB keyboards seem to have three LEDs for CAPS, SCROLL and NUM LOCK indication. Since the NUM and SCROLL LOCK features are hardly used, and the keys are not even on my laptop, I thought I could use these to switch my loads. This would also mean that I do not need to load any drivers or look for ports in order to drive them which was also desirable.
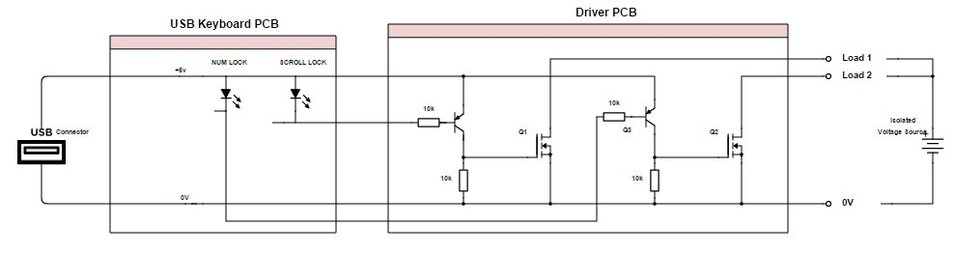
I had a couple of old USB keyboards lying around so I quickly ripped out the small PCB inside one of them and probed with a DVM to find that the LED anodes are connected to +5V (common anode) and the cathodes are switched low via a current sink. This is actually very flexible since the LEDs could be easily removed and the outputs connected to Solid State Relays to drive isolated mains loads. However, for my application I just wanted to switch around 4A using a 12V DC isolated supply. To do this, I added a PNP inverter stage to each LED which was
hen used to switch the gate of an N-Channel MOSFET as shown in the schematic below.
This is a quick and cheap way to be able to switch a couple of electrical loads via the USB port using an old USB keyboard. It's not particularly elegant as there are some compromises but it is quite easy to implement. This approach could also be used for push button inputs but this was not a requirement for my particular application.
I was dabbling with python to produce an application to run on a my Windows based laptop/netbook and wanted to independently switch a couple of low voltage halogen lamps when using an attached web camera. Using the USB port to an Arduino was a possibility but seemed like overkill for just two On/Off drives so I started to look at the small controller PCB found typically in the back of USB keyboards.
Most USB keyboards seem to have three LEDs for CAPS, SCROLL and NUM LOCK indication. Since the NUM and SCROLL LOCK features are hardly used, and the keys are not even on my laptop, I thought I could use these to switch my loads. This would also mean that I do not need to load any drivers or look for ports in order to drive them which was also desirable.
I had a couple of old USB keyboards lying around so I quickly ripped out the small PCB inside one of them and probed with a DVM to find that the LED anodes are connected to +5V (common anode) and the cathodes are switched low via a current sink. This is actually very flexible since the LEDs could be easily removed and the outputs connected to Solid State Relays to drive isolated mains loads. However, for my application I just wanted to switch around 4A using a 12V DC isolated supply. To do this, I added a PNP inverter stage to each LED which was
hen used to switch the gate of an N-Channel MOSFET as shown in the schematic below.
Schematic
The MOSFET used has a relatively low Vgs threshold which performs quite well when switched using 5V logic levels. The PNP transistors used were BC327 parts that I had lying around and the MOSFETs were FQP30N06L (60V, 32A). This provides way more power switching than I needed but with approximately 4.5V gate drive the max current capability will be reduced and works fine on the loads I needed even with the high inrush current for the lamp loads.
USB keyboards can be easily scrounged or bought for as little as £3 and the other components sourced for less than £2. These just happened to be in my collection of bits.
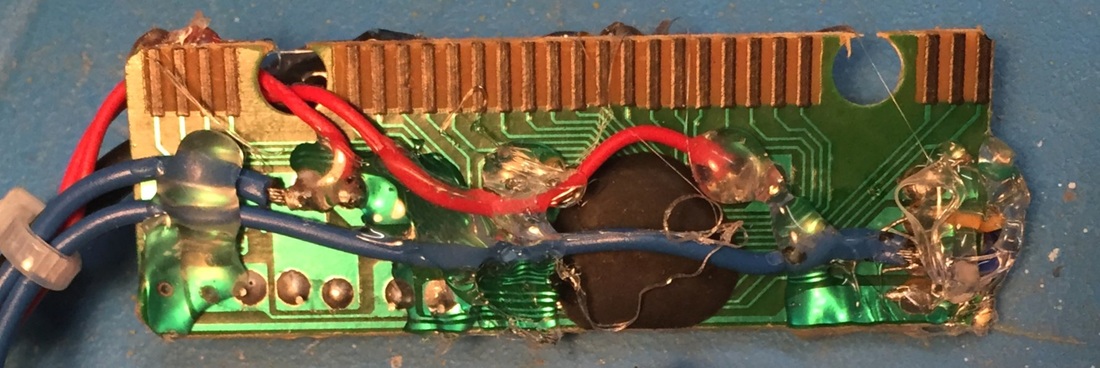
The 0V and +5V power connections can be picked up at the point where the USB cable attaches to the PCB or using a convenient point on the PCB such as a LED anode for the +5V. Do check with a DVM as I have only taken two circuit boards out of keyboards so it is possible some circuits work with the LEDs configured as common anode. The switching signals can only be picked up by carefully soldering onto the cathodes of the LEDs. Again, do check with a DVM as one of the LEDs was laid out with pads non symmetrical to the other two on the circuit board that I used.
USB keyboards can be easily scrounged or bought for as little as £3 and the other components sourced for less than £2. These just happened to be in my collection of bits.
The 0V and +5V power connections can be picked up at the point where the USB cable attaches to the PCB or using a convenient point on the PCB such as a LED anode for the +5V. Do check with a DVM as I have only taken two circuit boards out of keyboards so it is possible some circuits work with the LEDs configured as common anode. The switching signals can only be picked up by carefully soldering onto the cathodes of the LEDs. Again, do check with a DVM as one of the LEDs was laid out with pads non symmetrical to the other two on the circuit board that I used.
Rear view of USB keyboard with driver hook-up wires attached (2 red and 2 blue)
The python code to drive the LEDs and outputs is as follows:-
#Initialisation
import win32com.client as comclt #used for SendKeys
wsh= comclt.Dispatch("WScript.Shell")
....
....
#Main code
#every time you need to toggle the NUM LOCK LED execute this statement
wsh.SendKeys("{NUMLOCK}")
#every time you need to toggle the SCROLL LOCK LED execute this statement
wsh.SendKeys("{SCROLLLOCK}")
Note that you also need to have the Python for Windows extensions pywin32 installed for your version of python.
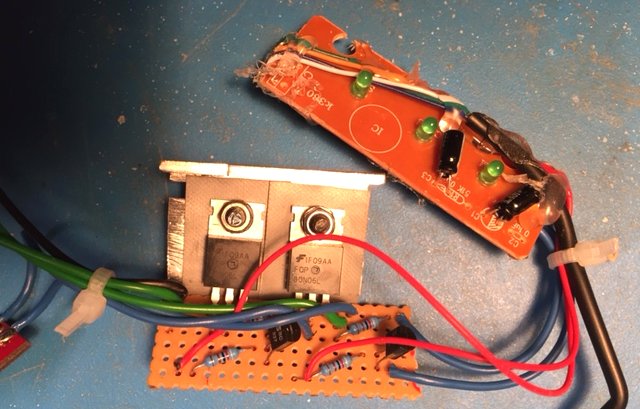
USB Keyboard PCB and driver PCB
One of the disadvantages to this approach is that you can only toggle the LEDs and you can’t specifically command the LEDs On or Off. Therefore, you have to provision a method in your program to be able to set these to the correct initial state. Alternatively if you just plug in an external USB keyboard you can toggle the outputs manually using the respective keys. A further disadvantage is that turning on the NUM and SCROLL Locks might impact other keyboard and mouse operations but otherwise the hack is relatively cheap and easy to do and does not require any additional drivers or port setup.
The CAPS Lock LED could also be used in the same way to provide a third output driver but this might limit keyboard operations. For my application, I intend to use the touch screen on my Laptop/Netbook as an input device otherwise I could have used the same approach for switch inputs as well since there are plenty of keys to choose from.
The CAPS Lock LED could also be used in the same way to provide a third output driver but this might limit keyboard operations. For my application, I intend to use the touch screen on my Laptop/Netbook as an input device otherwise I could have used the same approach for switch inputs as well since there are plenty of keys to choose from.
